Hello everyone !
How is your December going ?
I myself have been busy with Christmas projects around the house, regular life, elf mischief planning, and Christmas planning.
I wanted to share my DD days 2 and 3 with you today.
Day 2 | Shopping in the rain with a friend. Lunch at Chipolte. And Santa hats.
A lot like day 1, I only took a few pics and they were all Instagrams. So the square page protector was perfect.
I dressed up the top photo with a photo overlay, a circle sticker, washi tape, and a clear sticker from Simple Stories.
I punched out the number 2 circle from the SC PL kit and put it on top of my journaling strip.
* TIP - For my journaling space I used the star screen from a previous SC PL
kit. I sprayed some color spray (primerose color shine from Heidi Swapp)
onto a paper towel. I took a Q tip to get the color spritz onto my journaling page. I placed the screen over my journaling page exactly where I wanted the stars and then used my Q tip to color in the stars. *
As I mentioned above, I had lunch at Chipolte. I used a gift card that I won at a bunco night, that had a great card sleeve. It was the perfect size for my journaling page. I included it on the bottom of the page.
Day 3 | I got started decorating the house. Got the garlands up, the stockings, the wreath on the front door, and a few misc. things.
Here is a look at Day 2 and Day 3 together.
I really loved this journaling card from a SC kit. I used the same technique with the Q tip ( as talked about above) to color in the word "FAVE" on the journaling card. I really wanted to try and coordinate both pages and make them somewhat the same color scheme.
I added the Ali Edwards heart and the "deck the halls" brushes to the journaling card and then doodled around my journaling.
I added the photo of my wreath to a piece of star transparency. The plan was to put one picture on each of the sides of the star transparency and then stitch them into place. It mostly worked, cause can I just say that my sewing skills are at an -11 ! None ! I'm just rolling with it.
I added a photo of our elf Harry to the other side of the transparency (for day 4). You will see when I share day 4.
Got me in the album this year ! Yeah for self timers.
I added this fun silver number 3 from Pink Paislee. Also the star from SC. Also added this great brush from Wilna. Find it here.
That's a wrap folks.
Day 2 and 3 are done.
Happy Holidays everybody.
Showing posts with label Tips. Show all posts
Wednesday, December 10, 2014
Monday, February 4, 2013
Digital Product Organization
DIGITAL PRODUCTS
One of the questions that I get asked all the time is how do I store/organize my digital products. By digital products I mean Digital Brushes, Papers, Templates, Journaling cards, ect.
I am not sure that my way is any different than anyone else's. But I wanted to show you how I have it all organized. By all means, if you any of you have any other ways of organizing, please share !! I am always looking for ways to simply things.
Before I begin I want to start by saying that I have two parts to my organization. The first one is all on the computer, everything organized in their respected files. The first one is what I am going to talk about today. I will share the "physical" part of how I can keep a "visual" tab on some of my digital stuff in another post.
The first thing that I have done is to put them all in one spot. I have a file labeled "Digital". It looks like this. I apologize for it being so small. If you click on the photo you can see it better.
In the "Digital" file itself I have broken it down into categories. They are as follows. I will go further into detail on some of them later in the post.
1. Journaling Cards
2. Filler Journaling Cards - These are the quote cards, ect.
3. Disney - Anything to do with Disney.
4. Christmas - I used to keep all the brushes together but whenever I needed to find a Christmas one, I had to go looking through all the Digital Brushes to find them. So I have separated them for easy access. ** This file is all things Christmas. Brushes, Journaling Cards, Templates, ect. **
5. Templates
6. Paper
7. Extra Elements. This one is anything other than brushes. For example - Digital embellishments.
8.Clementine Kit
9. Cobalt Extra Elements
11. Turquoise Journaling Cards
12. Seafoam Kit
13. The word week for my 2013 Title cards
14. Turquoise Extra Elements
15. Digital Brushes
16. Kits
Now let's take a closer look at what is inside some of these files. I am going to start with The Journaling Cards File. In the beginning I had them separated in their own file, the ones that came in a set. But that wasn't working out to well because there were so many that I couldn't remember what they all looked like. So I would have to open up all the different files and look through it to find the one that I wanted. I decided to separate them all so that way I could see them all by scrolling up and down. It is working out great !!
Here is what the Journaling Cards File looks like.
All of my cards are now in pretty rows, all visible, all easily accessible with the scroll of my mouse. To achieve this all you need to go through your files and copy all of the cards and paste them into the journaling cards file. And then delete the file that contained the journaling cards. For example, let's say you downloaded some free cards. They would come all in a seperate file with their name on it. Simply go into the that file and copy all the cards in that file. Make sure you don't copy the preview file that comes with most of them. Then go out into the journaling cards file and paste them in there. I hope that makes sense.
This method continues throughout my other files as well. For example, the filler cards. They are all like this for easy access.
The last one I want to show you is my Digital Brushes. Here is what it looks like. I have chosen to keep them all contained in their own seperate files. If I were to separate these, I don't think that would be the best solution.
** Stay tuned for the next installment of Digital Product Organization to explain what I have done with my digital brushes to make a "physical copy". It will show how you can be able to see them all.
That is all I have to share with you today. If you have any questions about anything please don't hesitate to leave a comment and I will get back with you.
And again, If you have any other ways of organizing your digital files, please share. I would love to hear them.
Have a wonderful Monday everyone !!
One of the questions that I get asked all the time is how do I store/organize my digital products. By digital products I mean Digital Brushes, Papers, Templates, Journaling cards, ect.
I am not sure that my way is any different than anyone else's. But I wanted to show you how I have it all organized. By all means, if you any of you have any other ways of organizing, please share !! I am always looking for ways to simply things.
Before I begin I want to start by saying that I have two parts to my organization. The first one is all on the computer, everything organized in their respected files. The first one is what I am going to talk about today. I will share the "physical" part of how I can keep a "visual" tab on some of my digital stuff in another post.
The first thing that I have done is to put them all in one spot. I have a file labeled "Digital". It looks like this. I apologize for it being so small. If you click on the photo you can see it better.
In the "Digital" file itself I have broken it down into categories. They are as follows. I will go further into detail on some of them later in the post.
1. Journaling Cards
2. Filler Journaling Cards - These are the quote cards, ect.
3. Disney - Anything to do with Disney.
4. Christmas - I used to keep all the brushes together but whenever I needed to find a Christmas one, I had to go looking through all the Digital Brushes to find them. So I have separated them for easy access. ** This file is all things Christmas. Brushes, Journaling Cards, Templates, ect. **
5. Templates
6. Paper
7. Extra Elements. This one is anything other than brushes. For example - Digital embellishments.
8.Clementine Kit
9. Cobalt Extra Elements
11. Turquoise Journaling Cards
12. Seafoam Kit
13. The word week for my 2013 Title cards
14. Turquoise Extra Elements
15. Digital Brushes
16. Kits
Now let's take a closer look at what is inside some of these files. I am going to start with The Journaling Cards File. In the beginning I had them separated in their own file, the ones that came in a set. But that wasn't working out to well because there were so many that I couldn't remember what they all looked like. So I would have to open up all the different files and look through it to find the one that I wanted. I decided to separate them all so that way I could see them all by scrolling up and down. It is working out great !!
Here is what the Journaling Cards File looks like.
All of my cards are now in pretty rows, all visible, all easily accessible with the scroll of my mouse. To achieve this all you need to go through your files and copy all of the cards and paste them into the journaling cards file. And then delete the file that contained the journaling cards. For example, let's say you downloaded some free cards. They would come all in a seperate file with their name on it. Simply go into the that file and copy all the cards in that file. Make sure you don't copy the preview file that comes with most of them. Then go out into the journaling cards file and paste them in there. I hope that makes sense.
This method continues throughout my other files as well. For example, the filler cards. They are all like this for easy access.
The last one I want to show you is my Digital Brushes. Here is what it looks like. I have chosen to keep them all contained in their own seperate files. If I were to separate these, I don't think that would be the best solution.
** Stay tuned for the next installment of Digital Product Organization to explain what I have done with my digital brushes to make a "physical copy". It will show how you can be able to see them all.
That is all I have to share with you today. If you have any questions about anything please don't hesitate to leave a comment and I will get back with you.
And again, If you have any other ways of organizing your digital files, please share. I would love to hear them.
Have a wonderful Monday everyone !!
Friday, July 27, 2012
Project Life Week 17
I just want to start out by saying how excited I am about the new plastic's from Becky Higgins. They arrived at Amazon last night and I was thrilled. If you haven't taken a peek yet, I would highly recommend it !!
Photo is from Becky Higgins blog
Anyways, back to the blog post. Week 17 is now done. A basic week around the house, spent a lot of time outside. And we had my mom here for a visit, we always love that.
FIRST PAGE :
THE PICTURES :
Used this brush.
We bought a swing set for the backyard.
Used Ali Edwards Circle Of Life Brush.
THE JOURNALING CARDS :
LEFT SIDE : The happy banner I believe is from Dear Lizzy Neapolitan . Letters from October Afternoon.
TIP #1 OF THE DAY. Most of you might already know, but I'm going to share anyways. If you don't want the xtra bulkiness of chipboard pieces on your pages, or journaling cards, peel the extra layers off. I do this all the time with the chipboard pieces I put into my PL album. I strip them down to just the paper layer so that I can fit more into my album !!
RIGHT SIDE : I found a picture from online about the Hunger Games and sized it to fit right onto the journaling card. Put our ticket stubs on top and called it good.
LEFT SIDE :
Washi tape, and a heart brush from Ali Edwards. Arrow from Studio Calico.
RIGHT SIDE : Sticker from Echo Park Note to Self. Butterflies are from Studio Calico.
THE SECOND PAGE :
THE PICTURES :
Use this brush.
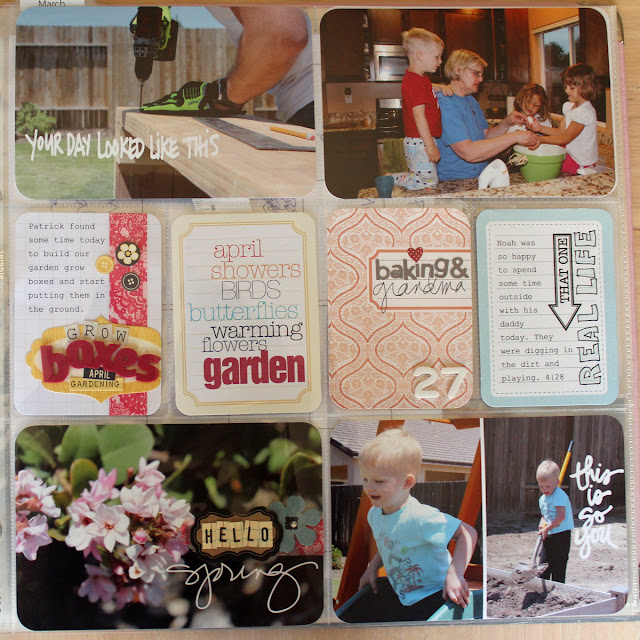
Patrick spent the weekend building garden grow boxes and then putting them in the ground. Not an easy thing !!
Used a word from here .
Added Washi tape a flower and hello.
TIP #2 OF THE DAY : If you are running out of letters in your letter sticker sheets. Try to look and see if you can use one of the other letters and then use a pen to make a new letter. For example I took an F and turned it into and e for my HELLO below. I also used the C and turned it into and O. You can't tell unless you look really, really close.
You Are Awesome Brush from Ali Edwards .
Pictures of Noah from the weekend.
THE JOURNALING CARDS :
LEFT SIDE :
A strip of Washi tape down the side. All the stickers are from Jillibean Soup Coconut Soup collection(except for the letter stickers) which is all about spring, gardening, and such.
RIGHT SIDE :
I used this great Spring freebie card. Placed it over the yellow journaling card in photoshop. Reduced the opacity of the freebie card so that I could see where the letters would end up when i printed it out onto the yellow card. I then moved the words around so that they would print where I wanted them on the card and printed. I love the end result, I wanted something else besides a white background card. ** Also changed the colors of the words to match.
Photo is from Becky Higgins blog
Anyways, back to the blog post. Week 17 is now done. A basic week around the house, spent a lot of time outside. And we had my mom here for a visit, we always love that.
FIRST PAGE :
THE PICTURES :
Used this brush.
We bought a swing set for the backyard.
Used Ali Edwards Circle Of Life Brush.
THE JOURNALING CARDS :
LEFT SIDE : The happy banner I believe is from Dear Lizzy Neapolitan . Letters from October Afternoon.
TIP #1 OF THE DAY. Most of you might already know, but I'm going to share anyways. If you don't want the xtra bulkiness of chipboard pieces on your pages, or journaling cards, peel the extra layers off. I do this all the time with the chipboard pieces I put into my PL album. I strip them down to just the paper layer so that I can fit more into my album !!
RIGHT SIDE : I found a picture from online about the Hunger Games and sized it to fit right onto the journaling card. Put our ticket stubs on top and called it good.
LEFT SIDE :
Washi tape, and a heart brush from Ali Edwards. Arrow from Studio Calico.
RIGHT SIDE : Sticker from Echo Park Note to Self. Butterflies are from Studio Calico.
THE SECOND PAGE :
THE PICTURES :
Use this brush.
Patrick spent the weekend building garden grow boxes and then putting them in the ground. Not an easy thing !!
Used a word from here .
Added Washi tape a flower and hello.
TIP #2 OF THE DAY : If you are running out of letters in your letter sticker sheets. Try to look and see if you can use one of the other letters and then use a pen to make a new letter. For example I took an F and turned it into and e for my HELLO below. I also used the C and turned it into and O. You can't tell unless you look really, really close.
You Are Awesome Brush from Ali Edwards .
Pictures of Noah from the weekend.
THE JOURNALING CARDS :
LEFT SIDE :
A strip of Washi tape down the side. All the stickers are from Jillibean Soup Coconut Soup collection(except for the letter stickers) which is all about spring, gardening, and such.
RIGHT SIDE :
I used this great Spring freebie card. Placed it over the yellow journaling card in photoshop. Reduced the opacity of the freebie card so that I could see where the letters would end up when i printed it out onto the yellow card. I then moved the words around so that they would print where I wanted them on the card and printed. I love the end result, I wanted something else besides a white background card. ** Also changed the colors of the words to match.
LEFT SIDE :
I used a Studio Calico journaling card. Added the word grandma from Ali Edwards family brush and then added the other letters and the number 27 for the date.
RIGHT SIDE :
I outlined the REAL LIFE that is on the journaling card so that it would stand out more. Added the arrow rubon from Jenni Bowlin.
That is the end of week 17.
I just wanted to let you know that the kids and I are leaving for Utah on Sunday for 2 weeks. So I will plan on doing some photo only posts while I am there. I need to share our beach photos. But unfortunately no Project Life posts until I get back. Thanks for the understanding. Hope this post will tide you guys over until I get back.
Happy Summer to everyone. Go have some fun and enjoy this great time of the year.
Sunday, April 8, 2012
Page Protector Tip
Today I want to take a little time to talk to you about page protectors. Yes, page protectors. I am sure most of you, at some point or another, have thought about them and asked "How do I store these?" I've been there people.
I want to share my preferred method of storing my page protectors. For years and years now I have stored them in a empty 12 X 12 Album. It works great. They stay up straight, they don't fall of the shelf, they don't get all bent up.
The page protector is growing in popularity now a days with PL and other like projects on the market. They come in a million different shapes and sizes. I started this year with all my page protectors all together in my empty 12 X 12 album. It seemed fine but I had one problem. When I wanted a certain page protector I would have to go hunt, and flip through the whole album to find it. Because they are all clear and see through, I had to go through each one to find the one I wanted. This past week I sat down and made some dividers for my album. Now everything is all sorted and in it's proper place. And best of all I can find the certain page protector in no time.
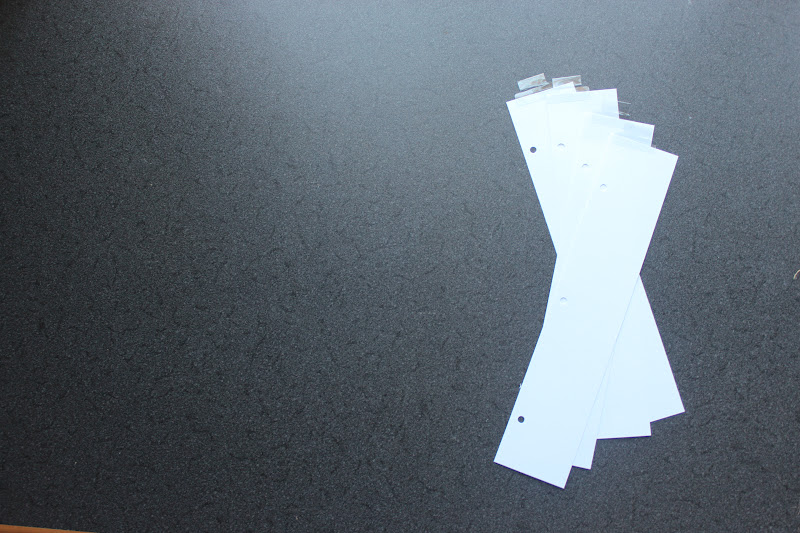
I cut up strips of cardstock to make my dividers. I cut them 2 1/2 X 12. Then I punched three holes using one of the page protectors as a guide.
The next step was to add some clear tabs. I picked some up at Home Depot.
I hand wrote the different page protectors names/size. When writing the Becky Higgins page protectors tabs I wrote the name of the design on the tab.
Now I was ready to add them to my album. For those smaller page protectors (the 6X6 ect.) I put them in the front without a divider. I started using my dividers with my 6X12 page protectors.
Here is a look at the completed album. All my lovely page protectors sorted and divided. Ahhh !! I feel so much better.
I hope this post has helped or inspired you in one way or another. If any of you have any other great ways to store your page protectors please let me know and be sure to leave a comment. I would love to hear from you !!
**Album is American Crafts 12 X 12 in Brown
P.S. The Becky Higgins Plain Scrapbook Dividers would be great for this project.
P.P.S. I am slowly working on my next PL week. It was the week we went to Disneyland, so I have SO many photos !! Thanks for being patient with me. Life has been SOOOO busy around here. I will hopefully be able to share sometime soon !!
I want to share my preferred method of storing my page protectors. For years and years now I have stored them in a empty 12 X 12 Album. It works great. They stay up straight, they don't fall of the shelf, they don't get all bent up.
The page protector is growing in popularity now a days with PL and other like projects on the market. They come in a million different shapes and sizes. I started this year with all my page protectors all together in my empty 12 X 12 album. It seemed fine but I had one problem. When I wanted a certain page protector I would have to go hunt, and flip through the whole album to find it. Because they are all clear and see through, I had to go through each one to find the one I wanted. This past week I sat down and made some dividers for my album. Now everything is all sorted and in it's proper place. And best of all I can find the certain page protector in no time.
I cut up strips of cardstock to make my dividers. I cut them 2 1/2 X 12. Then I punched three holes using one of the page protectors as a guide.
The next step was to add some clear tabs. I picked some up at Home Depot.
I hand wrote the different page protectors names/size. When writing the Becky Higgins page protectors tabs I wrote the name of the design on the tab.
Now I was ready to add them to my album. For those smaller page protectors (the 6X6 ect.) I put them in the front without a divider. I started using my dividers with my 6X12 page protectors.
Here is a look at the completed album. All my lovely page protectors sorted and divided. Ahhh !! I feel so much better.
I hope this post has helped or inspired you in one way or another. If any of you have any other great ways to store your page protectors please let me know and be sure to leave a comment. I would love to hear from you !!
**Album is American Crafts 12 X 12 in Brown
P.S. The Becky Higgins Plain Scrapbook Dividers would be great for this project.
P.P.S. I am slowly working on my next PL week. It was the week we went to Disneyland, so I have SO many photos !! Thanks for being patient with me. Life has been SOOOO busy around here. I will hopefully be able to share sometime soon !!
Subscribe to:
Posts (Atom)