Showing posts with label Tutorial. Show all posts

Thursday, January 24, 2013

Changing Colors Tutorial

One of the questions that I get asked often is how to change colors of layers, brushes, ect. Today I am going to do a quick tutorial for those who are curious.

I know that most of you already know how to do this, but some of us do not. So today is for you !! 

** DISCLAIMER ** I am no expert in photoshop. I am self taught ( Thank you google ) and have had to figure things out on my own. But this one is an easy one. Now for todays tutorial I am using Photoshop 10 Editor. I use photoshop for everything digital that I do.

I am going to show you how to change the color on two different things. The first one being a journaling card and the second one being a digital Brush. They have two different techniques on changing the color.

The first one is going to be the journaling card. So let's begin.

STEP #1.  Open the file that you want to change the color on. For this tutorial I am going to start out with a journaling card from the Seafoam kit.


You can see that it is a blue color. But let's say that you wanted it yellow. 

STEP #2. Open the file that has the color you want to change it to. It can be anything. Another journaling card, digital paper, even a photo. I am going to use another journaling card from the Seafoam kit.


STEP #3. Select the eyedropper tool. It is located on the far left side in the row of options, called the tool bar. It is a red eye dropper. See photo below.


STEP #4. Move the eyedropper over to the color that you want to select. And simply click on the color. You can tell that it changed the color by looking at the color block on the far left row. The very bottom are two color boxes. The top one is the color that you have selected. Make sure it is yellow ( or whatever color you want to change it to).


STEP #5. To change the color of this journaling card you are going to need to use the paint bucket tool. Located on the far left row. See below photo.


STEP #6. Before you are ready to change the color of the journaling card to yellow. You will need to make sure that you are working on the right item. You can either close the yellow journaling card so it is out of the way or make sure the blue journaling card is selected. To do that look on the far right side about middle of the way down. You will see where it says Layers. This box will show you which layer you are currently working on. You can see in the photo that it the blue journaling card is selected. If you still see the yellow one under where it says Layers simply move your mouse to the blue card and it should switch over and so that the blue card is now visible.

Select the paint bucket tool. Move it over to the color that you want to change. In this case the blue on the journaling card is what we want to change to yellow.  Hold the mouse over the blue color and simply click the mouse and it will change to yellow. It will first look like this.


Simply do the same thing to all of the blue parts of the journaling card. It will look like this when you are done.  If you accidentally click on something you didn't want to change the color on simply hit the undo button on the top right corner. I personally love the undo button !


So that is it for changing the color of a journaling card.

Now I want to show you how to change the color of a digital brush.

I have kept the journaling card that we just changed colors on. We will work with that one.

STEP #1. Open the brush and place where you want it on your card, scrapbook page, ect.  I choose to use one of Ali Edwards Everyday Photos Brushes. You can find it HERE.


STEP #2. Open the file that has the color that you want to change the brush to. Again, it could be another journaling card, digital scrapbook paper, a photo. I have done them all.


STEP #3. Use your eyedropper tool again, mentioned above. Located on the far left row of options. It is a red eyedropper. Move it over to the color that you want to select and simply click on it. It will change the color. To make sure look on the far left side, the last option. There are two color boxes. The top color should now be the color that you have selected.

STEP #4. Now this step is going to be a little bit different than above. Now I want to point out that you can use the paint bucket tool to change the color of the brush. For instance, if you wanted to just change a particular word in the brush and not the whole thing. You could use the paint bucket tool and just change the word and not the whole brush. But I want to change the whole brush color.

Go up to Edit. Top row, next to file. Select Edit and scroll down to where it says Fill Layer. See below photo.


Step #5. It will bring up a box that will look like this. See below. Next you will need to make sure the following things are done. They should be automatically when you bring the box up. But if they are not both done it will not work.

1. Make sure that the Opacity says 100 %
2. Make sure that the Preserve Transparency box is checked.


STEP #6. Once everything is ready to go, check and make sure that the layer that has the brush on it is selected. Once that is done click okay on the box and the brush will now be changed to the desired color.


Once that is done click okay on the box and the brush will now be changed to the desired color. The brush is now blue !! Success.


Now I know it seems like a lot of steps but once you do it a few times it will become second nature and it will get done super fast. It really is easy.


If you run into any problems along the way feel free to leave a comment and ask any questions that you need. I am always glad to help.

And there are so many great tutorials out there on how to do this. I know Ali Edwards has done many on this topic. I searched a little bit, not finding much. But I did find this video tutorial that she did. She recolored a brush that was on her photo. So check that out as well. As you might find it easier to follow in video format. CLICK HERE FOR THE VIDEO TUTORIAL.

I hope that you can use these principals to recolor your items. I sure do like to recolor things. It is fun and ads lots of color to my Project Life layouts.

Thanks everyone. Enjoy and happy coloring !! 


Saturday, December 10, 2011

Journaling card tutorial - Printing directly from printer

Hi there,

I wanted to take some time and show the process that I use to print my journaling cards. I have a printer that I can feed my journaling cards and print directly onto them. I wanted to show the process for those of you that can do the same. (If you have a printer that does accept smaller paper sizes) I have the Epson R1900.  It is really simple and you will love it !!

The first thing that you will want to do is find out your printer page size minimum. Mine is 3.50 inches X 3.50 inches. If you don't know what it is, go into the printing menu(as if you were printing something) and click on size or it might say change paper size. It will let you what the smallest - biggest size that you can print. Since my paper starting size needs to be 3.50 inches, we want to make a layer or background that is 3.50 X 3.75.

The actual journaling cards are about 2.75 inches by 3.75 inches. Since the width of the cards is smaller than my print paper size I had to put it on a background first.

Step #1. Click file, new, blank file and it will bring up this screen. You need to make it 3.50 X 3.75.

It should look like this.


Step #2.  Now I have found it a slight problem (at least for me) with the digital cards. The sizing is a little weird for me. They are 2.90 by 4 inches. And the actual journaling cards are 2.75 by 3.75 so I have to crop the digital card down to 2.70 X 3.75 and that seems to fix it. When I would print from the original size that the digital card was it would not fit on my card exactly where I wanted it too. I am thinking maybe the new cards are going to be this size ? Maybe. Will know tomorrow when my new kit comes in. Because my new plain grid journaling cards are that size - 2.9 X 4. Just a thought.

So you will need to crop the digital journaling card to 2.70 X 3.75.  Click on the crop tool. It is on the left hand side. Looks like a square box. And put in your crop size to 2.70 width and 3.75 length. ***UPDATED - Make sure that the resolution is 300*** Found towards the top below the main menu. *** SO THIS STEP IS VERY IMPORTANT ***

*** You can also use this method to journal on the plain journaling cards or other papers that you want to use Just use the digital card as a guide. ***

Step #3. Place your journaling card to the very left of your background.

It should look like this.


Now you are ready to journal and add your "STUFF". I added my journaling, leaving some room for an embellishment I want to add after printing.

The really nice thing about these digital cards is that if I want to add something later, after I have my journaling done, I just place the item directly onto the physical journaling card. And then I know exactly how much I need to leave for the item. I love it.

Step #4. Journaling. I added in my journaling.


Step #5. Remove the journaling card. You can either hide it or delete it. If you want to hide it so that you can access it later if you need to just click on the eye directly to the left of the layer. It will remove it and simply click it again to make it appear. ***VERY IMPORTANT ***

It will look like this


Step #6. Printing. Click on print. The print screen will come up.


Click on change settings. It might vary with each printer.

And then click on advanced settings. This is where you are going to change the paper size and such. I change the paper to plain paper when I am printing my journaling cards.

Now click on size. Scroll down to user settings. Change the size to 3.50  width X 3.75 length.


Click ok for this screen.

I always click on print preview so that you can see if everything is correct before you print. Also if you put things to close to the edge of the card you can see it in the print preview if it will cut some of it off. I've done this. So it is very helpful.  Make sure you click on portrait and not landscape option as well.

Click ok. Your screen should look like this.


Step #7. Click Print !!

Now you are ready to embellish it. Or slip it in to your album. Here is my finished journaling card in my album.


Simple as that. I have just gotten so used to this process that it is like second nature. So fast and easy to print my journaling cards. I hope you find these hints and steps helpful so that you too can print on your cards easily. Let me know if you have any questions.

And have a wonderful weekend.

P.S. Just about done with another week of PL and I've got some DD pages that I need to share. Stay tuned later today or tomorrow.


Thursday, December 8, 2011

Journaling Card Tutorial

So I know I promised a tutorial about printing on the Project Life journaling cards and I am finally putting it together. I want to show you two different journaling cards. One simple and one with more "Stuff". Also I have included a Q&A section at the bottom of this post that answers some of your questions.

We will start with the simple one.

                      JOURNALING

You first want to start out with the journaling card that you want to work with. In photoshop click file, open, and then locate the right journaling card that you want to journal on.

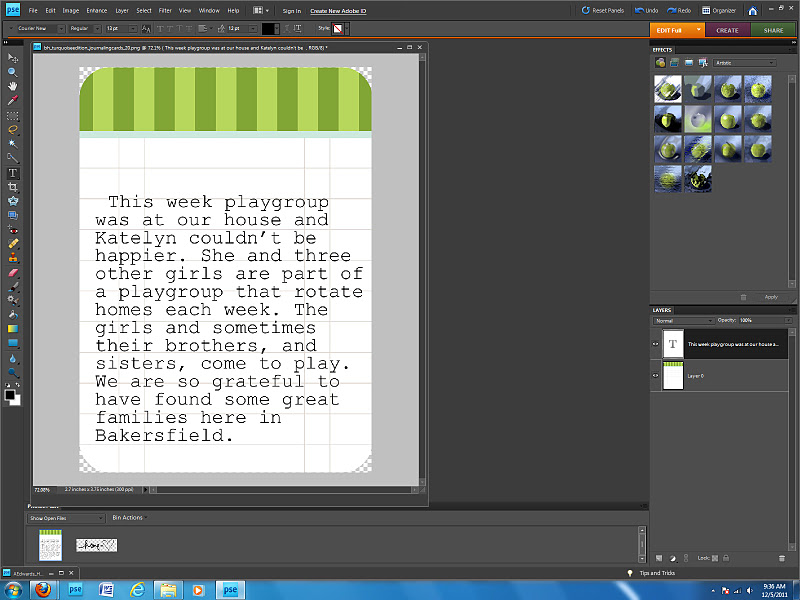
Your screen will look like this.


Now we need to add some journaling. For this card I wanted to tell the story about Katelyn  and her playgroup.

Click on the type key on the left hand side(It has a capital T) and start your journaling.

It will look something like this.


Now I do want to add a title for this card so I will pick another font and type it on my title. I underlined it to make it stand out.


                             PRINTING 

It's ready to print. Now there are a few ways you can go about this. If your printer will allow you to feed it through like you would a sheet of paper you can just print it like you normally would. (If your printer can accept the smaller cards and you would like to have me go through the steps for printing leave me a comment and I will make a tutorial on that as well.)

Most of you will have to print this way. There might be other ways you have figured out how to print as well. But this way is the one of the simplest ways that I know. It is all shown to you on the paislee press blog as well. Click here to see the blog post. 

You will want to print out the page with the journaling block from her website. Click HERE to download the page.

******* UPDATED *****  There is a new template for the new journaling cards. (the bigger sized journaling cards. Just look for the new size when you click on the link.

Also you will need to pull up that file in photoshop to add your journaling onto. ***Make sure when you pull up the file in photoshop that it is the one labeled paislee-3x4 journaling card-template. Don't pull up the actual photoshop file. It is the wrong size for printing on a 8.5x11. ***

It will look like this.


Next step is to move your journaling card, your journaling text box, and your title over into the box. The move tool is the very top one on the left hand side. (I realize most of you know this but trying to help the newbies).

Now in reality the first step you would have done was to open the journaling box template first. Then put your journaling card in and your text, and so forth. It will be easier the next time you do this process. And if you do all your cards at once it will be a breeze !! 


 Now you will have to delete the layer that says "your text here".Also delete the layer that says print guide.(It is the one that has the box on it) So the box won't print out onto your journaling card.

Next is to remove the journaling card. Delete the journaling card layer. **Very important step***


.Again - make sure that you delete the layer that says print guide.(It is the one that has the box on it) So now your screen should look like this.  **Very important step***


The next step is to adhere the physical journaling card to the paper with the box on it. I like the mounting square for projects like this.They are easily removable.On the paislee press blog she used double sided tape.


Put your paper through the printer.It should now have your journaling on it.


And now you can slide your finished card into your album.


I hope that has helped answer some questions for you all. It might seem like a lot of steps but it really isn't all that bad and if you journal on all your cards together you can be done super fast. If you have further questions or something was not clear please feel free to ask. Leave a comment and I will do my best to answer.

       THE SECOND JOURNALING CARD

I also wanted to show you how I use the digital extra elements and also how I incorporate my other embellishments onto my journaling cards.

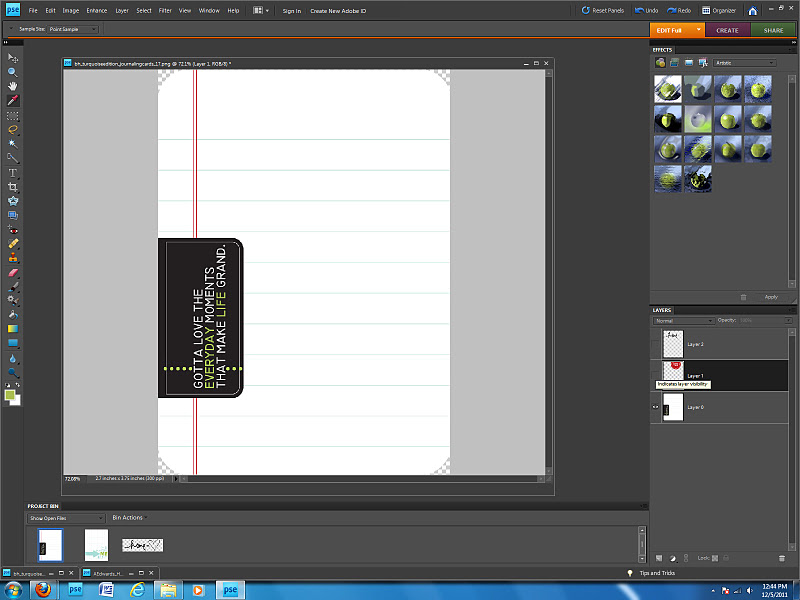
I choose this card


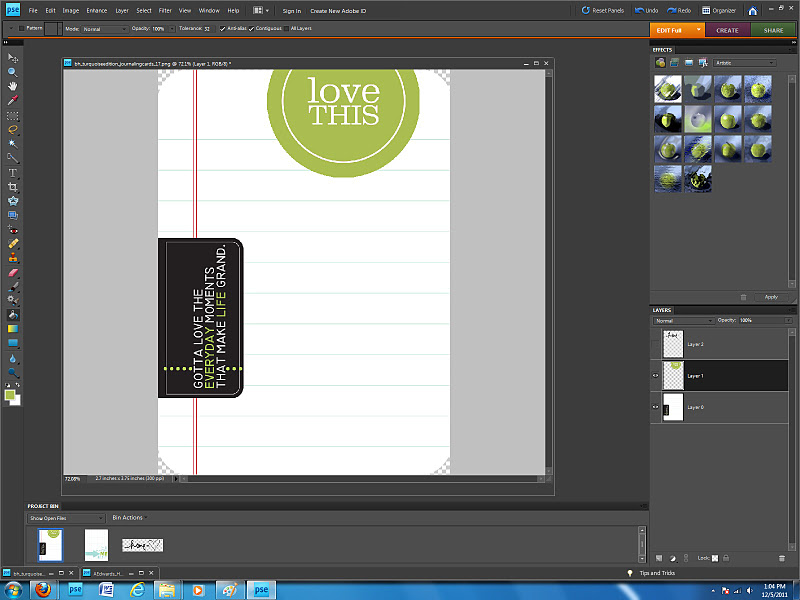
I wanted to add something else to the plain card so I choose to add this circle LOVE THIS embellishment from the Turquoise kit. 


 I do try to stay in the same color scheme for the entire week and that is what it is so great about the digital elements. You can change the color of them, and also make them any size that you want. I moved it to the top corner of the journaling card and change the color to match the green in the journaling card.


I want to now add my title. I wanted the title to be home grown. I have part of a brush with the word Home in it. You can find it here from Ali Edwards.

In this case I just wanted to use the word home instead of the whole phrase which was home = heart. So I used my rectanglar marque tool located on the left hand side. It looks like a dotted line box. Just click on the corner of the image you want to cut and drag it to the other side of your image. I will make a box. And just cut that part out and moved it over to my journaling card. You can see the part that I want to move is highlighted with the dotted lines.


And now it is moved over and in place.


I am going to leave some room on the journaling card for my letters that i want to add. Next I add my journaling.


I also wanted to add something to the bottom so I found the word priceless from Ali Edwards Hand Drawn Spring Words. Changed the color to the green and I am done.


Hide the journaling card layer or delete it(click the eye right next to the layer and it will hide it for you. Your ready to print. Follow directions from above.

It's ready for some more embellishing or to go right into your album. You see here that I added the letters to my title. Love it and super easy.


Also want to mention that google can be a great tool when it comes to learning photoshop. If you need to know how to do something or where something is, just google it !! 

If you need some more hints and help with photoshop check our Ali Edwards website and also Jessica Spraque. They both have wonderful tutorials on using photoshop.

Again. If you have any questions please leave a comment. And happy scrappin'.

**** P.S. DID YOU SEE THAT THE NEW COLLECTIONS OF CORE KITS ARE NOW AVAILABLE AT AMAZON !!!! GO, GO, GO. ALREADY ORDERED MINE. ****** 

                  QUESTIONS AND ANSWERS 
 Q : I want to know what kind of ink you use and price? Also, photo paper? Do you feel it is worth it printing at home? I'm toying with the idea of buying a photo printer. Would love your thoughts.

A: I have the Epson Stylus Photo R1900 Ink Jet Printer (which is now discontinued and the R2000 is in its place) and so I use Epson Ink. I choose to stay with the Epson ink as it is the best quality.  They run from 6.00 - 15.00 depending on the color for each cartridge. There are eight cartridges in the printer. My printer is pretty good on ink. For me it is definitely worth it to print at home.  For a lot of reasons, I print daily. When I get a few minutes I will go and print a few pictures or a journaling card for my PL album. It is a convenience thing. Plus you won't have any excuses not to work on your album if you have a printer available.  I could not imagine not having my printer. It is a little more money in the long run but I don't have time or the patience to be running to Costco every few days with my three small children. 


Q: I am getting the digital elements as part of my Christmas present but was wondering if you also will be buying any of the new Colbolt/Clementine products via Amazon and if so how you incorporate both. Thanks!


A:I am absolutely going to be purchasing the new core kit, actually already did. I went with Clementine this year. It was a real toss up between the two though. I plan on using most of the items that come in the physical core kit, the journaling cards, extra cards, and probably the numbers that come along with the kit. I prefer the traditional scrapbooking aproach but love to add some digital elements into the mix. So I will be using the digital journaling cards as a guide for my journaling cards so that I can print onto the physical journaling cards. Also going to be adding the extra digital elements onto my journaling cards. And possibly using some of the digital paper. They are going to be a great mix and so excited about the possibilities.

 I hope you have enjoyed this tutorial and found it helpful in some way. Again. If you have any questions please leave a comment. And happy scrappin'.