Sunday, February 19, 2017

Project Life Week 5

Hello everyone !

Welcome to another Project Life blog post.

Today I am going to be sharing Week 5.

Here is a look at the whole spread. A good majority of my photos are from an adventure we had on
Wednesday. It's not something I typically do but I had lots from that day and not a lot of other everyday photos.


My title card is pretty simple this week. I am striving to use some of my older supplies up and so I have put them together in a drawer. Each week that goes by I will look through that drawer and find something that I want to use. This time it was the wood No. piece. I've paired it with the red number 5 and a puffy sticker on the top.


The color scheme for this week came from my photos. Some green, blue, and a little red here and there.

This first journaling card talks a little bit about what was happening that week and also holds the dates for the week as well.

On the top of the card I went with a chipboard frame Simple Stories. Inside the frame I stamped the word currently several times and then added that blue puffy piece.


We have been watching the Lord of the Rings movies together as a family recently. The girls decided to be Elves for the afternoon. They wore they bows over their shoulders, they put their hair up, and then they went out Orc hunting. I took a photo of them scouting things out in the front bushes. On the photo I added a digital brush and a few embellishments.


I had the idea of spelling out elvish on this card here. I used some blue letter stickers from my Studio Calico kit and then added a few things above the word 

There is a photo on the top row that is of our arms. We all wrote our names in elvish and took a photo. My journaling tells the story about our Elvish afternoon.

The next photo is one that I took of Noah while we were on our Wednesday hike. He comes around the corner with this big rock and askes to take it home. Ummmm, no.


Here is a close up of the Elvish journaling card.


You can see the photo of our arms good in this photo.


Let's move on to the right side of the spread. This first photo is from our hike. I went ahead and added a few Digital brushes to the photo. 


This card was super fun to make. It was a little conversation that Katelyn and I had. I had this acrylic piece that said sparkle from Color Cast Designs. I incorporated in the journaling.


Another look at the right side. 


This photo of us on our hike was well worth the ice cream bribe !! I told the kids to start walking when I said go. I set the self timer on my camera and set it on the trail. I'm in love with the result. 

I added that half circle shaped piece to the bottom of the photo and added the chipboard adventure piece as well. It was perfect because we had our first Wednesday adventures. 


Here is a look at the right side. Lots of green photos and blue accents.


  This photo on the left is of the kids climbing the tree. When I was putting this week together I made sure to spread the darker photos around my spread for some balance.


While I was setting up our group selfie I snapped a few photos of the kids. 


That is it for week 5. I am so happy with how it turned out. Even though I only had a few everyday photos I'm so happy to have them in my album. Lots of fun stuff from week 5. 

Until next time everyone. 

Sunday, February 12, 2017

Project Life Week 4

Welcome to week 4 of my Project Life album. Thank you all so much for coming today.

I want to start by saying that this week was not my favorite. Meaning living it was not my favorite, creating these pages was much better. I am so happy with how the whole spread turned out though. Let's get started shall we.


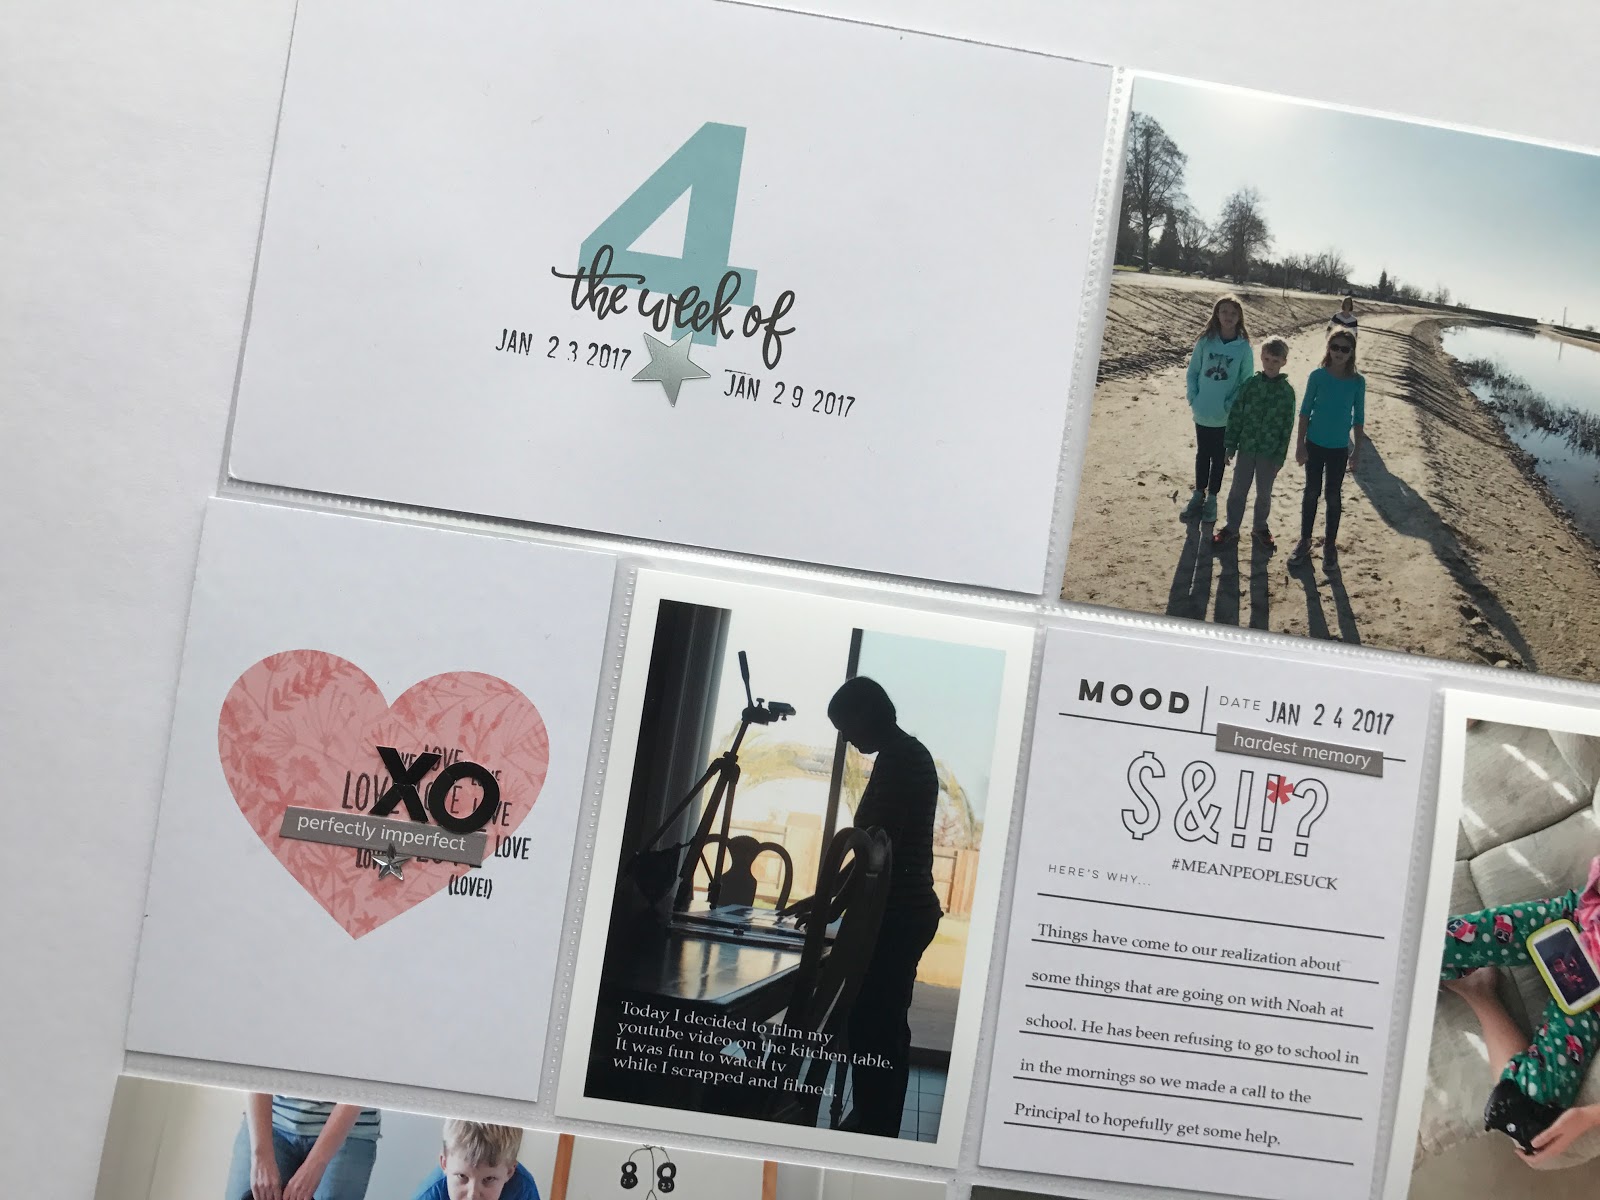
My title card is a total scrap lift from the fabulous Candice Perkins. So I have to give props to her. I used a card from Paislee Press and changed the color of the week number to match my spread. I added a star in the middle then used my date stamp.

The first 3x4 cards is a filler card. This week I did not have as many photos so adding in this filler card was perfect. I used a stamp from Studio Calico and added the letters X and O on top of the stamping. 

The next pocket has a photo of me filming a Youtube video while watching the tv one afternoon. 


This picture makes me laugh every time I see it. One afternoon Noah insisted that we work out. He brought the big weights down and instructed what to do with them. After that we went and ran around the neighborhood. After that we did jumping jacks, push ups and then some. So I made him take this photo of us going through the paces. 

I wanted to add a little bit of journaling to the photo and then I added that wood Happiness above it. 


This journaling card from Studio Calico was seriously perfect for the awful story from this week. Next to it is a photo of Katelyn on the couch. She had a sick day on Monday and spend the day on the couch.


I had more to say about this week than I had 3x4 cards so I added this big journaling card.


Friday afternoon we spent some time outside walking along the now flowing river. It has been raining so much lately that we now have a river. We took a panoramic photo of the river and the path that we were walking along. I stretched the photo out to be 4x18. To do this I cropped the photo in photoshop and then cropped each 4x6 piece so that way I could print it out.


Here are a few more close ups of the whole panoramic photo. The kids snuck around so that they could be on both sides of the photo.

I added some embellishments onto the photo and spread it over those two right side photos.


Ummmm. Yeah, I love this journaling card. It was perfect.


I wanted to use this wooden circle piece from Color Cast Designs to go with my phone photo. It fit perfectly on this flowery card here and I added my story on the bottom of the card. That photo is of me holding my phone. It is pretty dark but that was what I was going for. On my journaling card I added in how I read past my bedtime a lot !!


Typically I am not a fan of small photos but sometimes it just works out. I added my journaling onto this photo here of my jeans.


This photo turned out really well. The thought was to use the photo I took of my blooming lavender plant as a background for some words I shared on IG. I turned down the opacity of the photo in photoshop and added my journaling right over top.


I think that wraps up week 4 everyone. Thanks for coming over to the blog today. I really love sharing my work here with you and hope that you enjoy it as well.


Saturday, February 11, 2017

Project Life 2016 | Week 18

Hello everyone !

I thought it would be fun to share a Project Life Week from 2016. This particular week I have not shared yet here on the blog. I do have a walk thru of my 2016 PL album up on my youtube channel if your interested. ( search my name to find my channel)

Okay let's get going shall we. Here is what the whole spread looks like.


This week came together rather easily and I love the color scheme. I decided to shake things up this time and make a date card and add it in one of the 3x4 slots. So I added this filler card in place of the title card. It is from an older Studio Calico that said 2015 I think. So I covered up the 2015 with a puffy sticker.


It was Mother's Day weekend this week so I thought it was my right to get a family photo after church on Sunday. We had a neighbor snap a quick photo of us all and I love it. I have a few filler cards there in the middle pockets.


The kids played in the rain this week and of course Maddie had to lay down in the rushing gutter like it was the bathtub. 

I added a week # card from Paislee Press. 


I love how this top left photo turned out. It was raining so hard that I was perfectly content to hang out on the porch and snap some photos of the kids. I added a digital brush to both of these rain photos. 


It just so happens that Mother's Day and National Scrapbook Day were on the same weekend. This black handmade card was one that I loved but I didn't want to use the whole card. I cut it in half and added that label in the middle. 

The photo here is one of my favorites. I snapped it in the mirror of us getting dressed for church. 


This page protector on the right is Design B. I alternated journaling card and photos to give the spread a nice cohesive look. I always strive to break up the photos with journaling cards. 


That wraps up this Project Life catch up share post. I know it was a quick one today. Please feel free if you have any questions at all to leave a comment or send me an email using the gadget up at the top right hand corner. 

Most of these supplies came from my Studio Calico Documenter Kits, along with some digital brushes. 

Thanks again for coming everyone ! Have a great day. 


Monday, February 6, 2017

Project Life January Review

Hi guys !

I am back for another blog post today. I am going to share a fun pocket page spread all about some current things that are going on. 

These pages started to come together thanks to some product inspiration. I wanted to tell some fun stories using my products. I will get into that more as we go along. 

Here is what the whole project looks like. 


Making a title card was very important for this spread. I used a 4x6 card from an older Studio Calico kit. I have had these Ali Edwards ( I am pretty sure they are from Ali) Month stamps forever and thought that I would stamp January on the card. After that I also added that currently strip and then I spelled our FAV.

Typically my spreads are photo driven. I usually start with my photos and then use them to find common colors and so on. This time I started with some products that I have wanted to use and went from there.


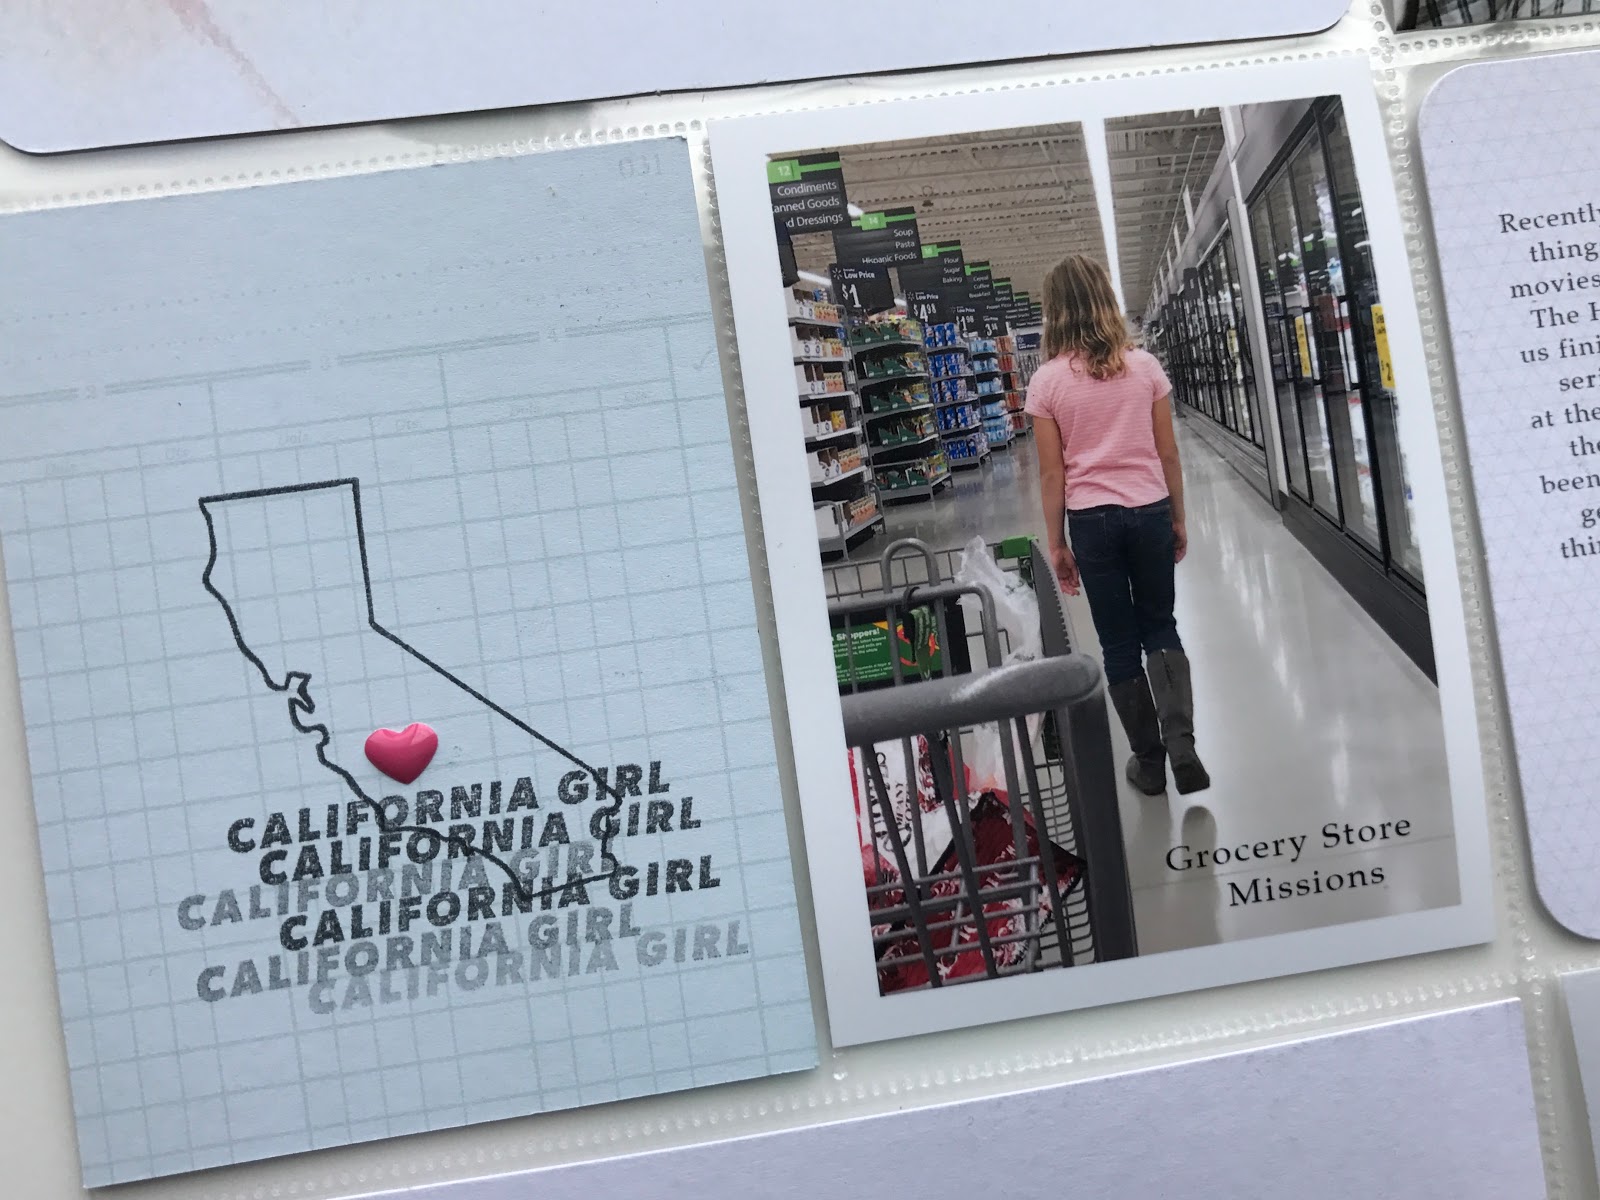
Since I am a recent California transplant I have been on the look out for California supplies. I picked up this fun California stamp from Kelly Purkey this past fall at the scrapbook expo.

I decided that I wanted to create a filler card using this stamp set. I stamped the Cali. state outline first and then I added the California girl stamp over top, stamping it repeatedly. I finished it out with a pink heart over where we are living.

The photo next it is about a small story that I have been meaning to add into my PL album for a while. I snapped a photo of her at the Grocery Store and added Grocery Store Missions. Long Story short : Whenever the kids come with me to the store I assign them " Missions". They are given a certain food to get and then I send off a few kids to go and fetch the item and then come back to the cart. The kids love it and it shortens our shopping time.


These few pages hold lots of fun stories and favorites. This story is about the messes we are making and how I want to make more messes even though my clean freak side is saying oh no you don't !


Here is a close up of the bottom part of the left side.


Next up are these middle pockets. I just love that tv tuned in card. We are a tv loving family. In the evenings we as a family have been working our way through the Hobbit movies. I found an image from the internet and printed out that Hobbit photo.


These wooden circles are among my favorite embellishments lately. They are from Color Cast Designs and the set is called 104 % Tired and the whole set is me to a T. I used this one that says Namastay in bed. Seriously, that is me lately. The weather has been dark, dreary, and rainy for most of January so it has been hard to have motivation to get things done. Oh and can I just say that trying to take a decent photo of me in bed and not have it look weird and akward was HARD. But I wanted a photo to go along with that wooden circle. Let's just leave it at that. HA HA.


Here is the right side of my spread. More stories.


This top card was inspired by another one of these wood circles. This one says 104 % tired and so I wanted to make it the O in Mom. So I added my journaling on the top of the card and added the MOM to the bottom. Yes, I know the words on the bottom of this card are upside down. I wanted the blue on the bottom and went for it.


This next photo and journaling card is another one that the products were the inspiration. This set is another one from Color Cast Designs. I loved the color and the wood piece that has a soda bottle on it. So I have to admit that I bought this Dr. Pepper bottle so that I could take a photo.


The last photo is one from the last weekend in Jan. We have spent a lot of time outside and at the park looking over the river that has been flowing. The weekend stamp is a digital brush from one of Paislee Press Pocket Guides.

I made sure to spread out my wood embellishments to make it flow more.


This page protector that is on the right side is one from Simple Stories and it has 3 4x6 pockets and then a 6x12 pocket. I have another project to go on the other side of this one and so I needed a 6x12 either photo or a patterned paper. I decided to print off this photo as a 6x8 size and add a journaling card on the bottom.


I chose this card that has this green bird on it to try and tie in some of the greens in my photos. This journaling card has a lot of tid bits about our favorites right now and of what has been happening in January. On the bottom of the card I added a few embellishments. This time I chose to add a few circle pieces and I love how simple but nice it looks.


Okay folks that is it for me in this blog post. I am so happy that these fun products have inspired me to get these stories told.

Please check out the Color Cast Design shop. It is full of wonderful inspiring products to get your stories told.

I also filmed a Youtube process video that will be up soon to my channel. So stay tuned for that and more Project Life blog posts to come hopefully this week. I have week 4 all done and it turned out great. Here is a link to my channel if you are interested.

Thanks everyone for coming ! 

Thursday, February 2, 2017

Project Life Week 2 & 3 | Simple Stories

Hi there !

Today I am going to be sharing some more Project Life pages. Now I have to explain about how I am going to be doing my January pages. It turns out that we went to Disneyland the second week of January and then we went to the beach the week after. So I had less photos from the regular week. I decided to combine week 2 and week 3. That is what you are seeing today.

I am using the new collection by Simple Stories called Love and Adore. I loved this collection ! The colors were so fun to create with.

So lets get started.


I am so happy with how this spread came together. The colors seemed to be made for each other. The products plus the photos. I had so much making this one.

For my title card I started out by cutting this awesome heart out from a 4x6 journaling card. I loved the pattern and the color of the heart but needed some more room to add my dates and stuff. I add it to a piece of white cardstock to make the heart stand out more. Since this was going to be my title card I had to figure out where to add my dates. I went with a label and tucked it underneath that hello chipboard piece. 


I went ahead and chose this journaling card with lots of white space and those hearts in a row at the bottom. I needed a card that I could add a longer story onto it and this one was perfect. The story goes with the photo below it. As you can see those great hearts on the bottom of the card. I accidentally discovered that the leftover/inside piece of the yellow chipboard heart fit perfectly inside these hearts. It adds a little piece of dimension to the card. 

The next card holds a photo of my son and has some journaling underneath the photo. I was working in my scrap room while the kids were playing outside one afternoon. My son thought it was so funny to sneak up and shoot his nerf gun at the window. The card itself has some embellishments on it already and it was perfect to add a few stickers and some enamel dots to finish it off. Simple and easy. 


Let's move over to the other side of my spread. It turned out that I had more to say about these weeks then I had smaller pockets. I added in this 4x6 journaling card to recap the week so to speak. On the bottom of the card I added that cute chipboard banner for some eye candy. The color scheme came together super easy this time with a lot of pinks, blues, and reds. I chose to create a filler card with this blue arrow patterned paper. On top of the card I layered some stickers and a cluster of embellishments up at the top. 


Don't be afraid to cut up your journaling and filler cards and use them as you need. That is what I did here with the watercolor strokes card. Originally it was a 4x6 card and I was looking for a  journaling card for my story about making things. So I cut it down to 3x4 and went from there. I wanted to talk about how we all have been making things lately. My husband has been baking bread and I have been busy making crafty things. I got to work and used a combination of letter stickers and the word sticker "be" as a title for my journaling card. I added some strips of washi tape underneath. It acted as a longer home for my title. 


I couldn't resist using these big and fun chipboard X and O pieces. So I used them right on top of my photo. It left this perfect little pocket to add my journaling on the other side. I also added in some of the bits and pieces above the X and O chipboard pieces. 


One photo that I did include in these pages were one from our trip at the beach. Whenever we go down to a particular beach we stop at the fruit stand. This time we picked up some strawberries, oranges, and mangos. It is kind of tradition to take a feet shot. 


That is a wrap of week 2 and week 3. I have already shared our Beach day pages and still need to complete the Disney spread and week 4. 2017 is off to a great start. 

Thanks so much for coming everyone !!